Dreamy Art Studio Whites + Lights
How do you turn your art studio into the perfect blank canvas for your artwork? You want a dreamy open room with a bright, fresh, airy environment for inspiration and creating. Find out the top 3 things you need to transform your room into the studio of your dreams— White walls, the right light fixtures & the perfect neutral light bulbs!
The perfect WHITE wall paint for a bright and dreamy art studio.
Something you may not know about me is that I LOVE to renovate and DIY projects are my favorite! When we moved into our new dream house in Nashville in December 2017, the to-do list for updates throughout the house was (and still is) very long. What we learned the hard way from renovating our first home is that you must focus on one project at a time. Our first project here would be replacing the nasty old carpet upstairs with real hardwoods. But, we had to wait on the wood to be ordered... so naturally we started another project!
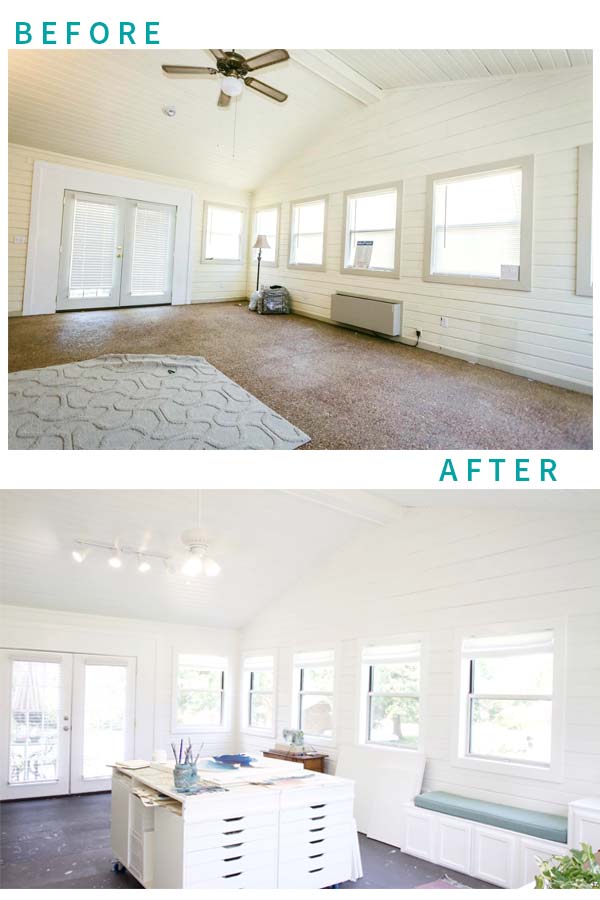
I was trying to get settled in my new studio and realized I couldn't take any photos of my work for my website or even instagram because my studio was maroon brick and dingy yellow walls with army green trim. I love to paint interiors but this studio has tall vaulted ceilings and I am not a fan of heights. My dad offered to bring in scaffolding and paint the entire studio white for me.
If you have ever shopped for white paint, you know there are SO many choices! You can choose whatever white you want for any other room in your house, but I think the best white for an art studio is neutral but just slightly warm so I chose DECORATOR WHITE from BEHR and I LOVE IT! I used it in my last studio in our first house, too, so I feel like I can say I know it will work well in any art studio.
Walls - Decorator White by BEHR in eggshell
Trim- Ultra Pure White by BEHR in semi-gloss
Check out the before and after photo below to see the transformation just paint and fresh light fixtures can make.
2. LIGHT FIXTURES without integrated bulbs
My dad is the Chip to my Joanna, and he suggested we replace the two recessed can lights with track lighting that would hold 3-4 bulbs each and give off a lot more light. *lightbulb* literally.
So I started searching Home Depot, Lowes, Wayfair, Overstock, anywhere for track lighting with 4 lights. Most of the ones I found had 3 and almost all of them had integrated bulbs where you couldn't change them, and they usually weren’t very bright and leaned blue. I'm not going to say it was impossible, but there weren't many options where you could choose your own bulbs. I love to shop online, but sometimes you just have to go into the store and talk to someone. So I went into Lowes and I found these track lights below- Project Source 42” 3 light with a 42” track . This Lithonia track light they currently have in stock is similar and they sell extra can lights individually to add to the track.
3. The Perfect Neutral White LIGHT BULBS
At first I tried the bulbs available at Home Depot- they were 2700-3000K and 5000K. But the 3000K were just too warm and yellow & the 5000K were extremely cold and blue feeling. I did a little more research online and ordered these bulbs from Amazon:
And this chart explains why these bulbs are absolutely perfect! See how the 3000K still looks yellow and the 5000K range leans a little blue? Plus, these are LED which uses less energy (11 watts) but still put off 950 lumens (the brightness). So with 4 bulbs in each of my two track lights & 3 bulbs in my new white ceiling fan, it is very bright in the studio, even at night it looks like daylight. And every artist knows you have to have good light in the studio at night because sometimes you have to burn the midnight oil.
Up Next on the Blog- The Perfect Art Studio Table
Every time I post a photo on my instagram with my table in it (like the one below), I get a ton of comments and messages about my table. So, next up- everything you want to know about my art table and how I keep supplies organized. Please comment with questions below- I would love to know what topics you want to hear more about on the blog. Thanks for reading!


